CLZ Hints, Tips, & Answers3108
Pages:
1
 COLLECTOR COLLECTOR
|
dielinfinite private msg quote post Address this user | |
| Collectorz.com's Comic Collector is one of the more popular collection management programs out there and the one I personally use. It's pretty well-featured and has a good degree of customization. Some of its features are easily overlooked or can be used in different ways to suit your needs. I wanted to start a thread where we could share ideas, ask questions, and show each other how we're using it in case other users can make use of it. To start off, I wanted to share a couple of things The first, are Links, shown here 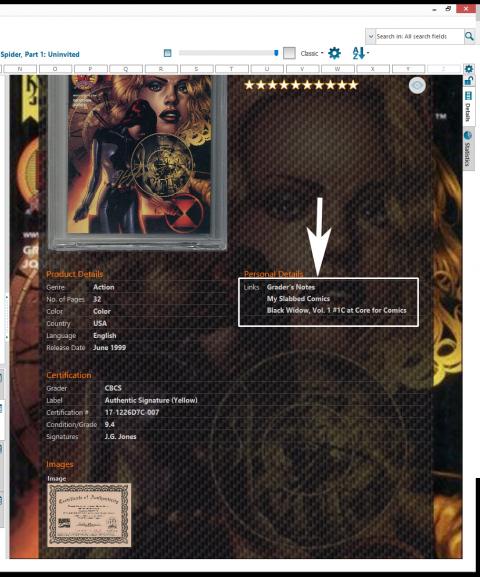 Not a big deal, really but it's a neat place to consolidate links around the web related to your book. To get started, open the Edit Comic menu by either pressing Ctrl+Enter, clicking on the pencil icon on the top left of the app, or by right-clicking on the comic you want to edit and selecting "Edit One Comic." 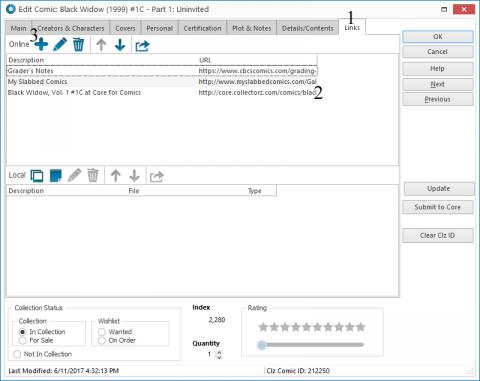 Once Open, click on the "Links" tab (1). Every comic, by default, will have a link to the book's entry in CLZ's internal database (2). To Add your own link, press the "+" icon (3). 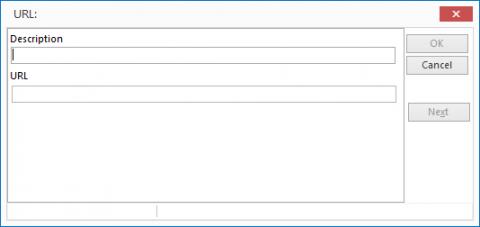 If you copied the link to your clipboard before hand, the program will automatically add it to the URL section, so all you have to do is fill out what the link is and press "OK." I like to use this feature to link my graded books to the Grader's Notes on CBCS' website, the CGC Verification page, and my book's page on MySlabbedComics.com but I'm sure some of you may have other links you'd like to keep handy. Next are additional Images, shown here: 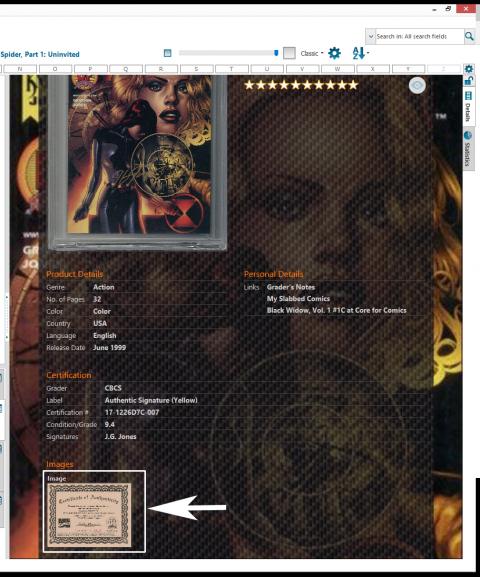 This is handled from the Links tab on the Edit Comic Menu, just like the web links above. 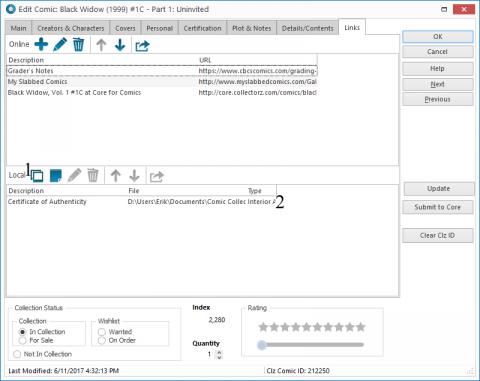 To add an image, click on the two polaroid pictures icon shown above (1). This will immediately open a file browser so you can find and select the image you want to add. Find and select the image you'd like to add and click okay. Once done, the file will be added to the list (2) but the description will read simply use the filename. The description isn't actually visible from the comic browser but it's nice to give it a description you can decipher in the future. To edit the description, double-click the image on the list, or select the image and click the pencil icon to the right of the button you used to add the image in the first place, it will become enabled when you've selected an image. 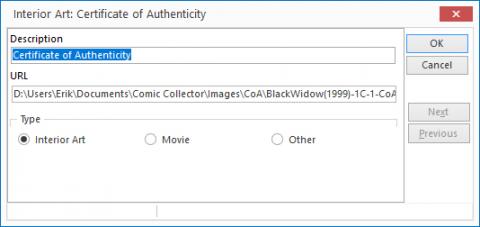 On this pop-up, simply type in your description and click Okay. "Interior Art" should be selected if you'd like the image visible in the comic browser. I've never used the "Movie" function but if any of you do use it, I'd love to see what it does/how it looks. "Other" will basically just save the file's location along with the book but it won't be visible in the comic browser." I like to use this feature for CoAs or to keep old images of a book that's been cracked and reslabbed. So there you go, nothing especially tricky but they can be easily overlooked. I'll write up a little more a bit later on some of the other ways I use the app but I'd love to hear how others use it or if you have any questions about the app or how it works please ask and maybe I or another user can help you find the answer you need. |
||
| Post 1 • IP flag post | ||
 past performance is no guarantee of future actions. past performance is no guarantee of future actions.
|
KatKomics private msg quote post Address this user | |
| I don't know. I've been just using excel for ages - have almost 7,000 books now is there a way to import?? Have never really looked at using a program/app to manage my books - if there was easy import then maybe - otherwise no way!! | ||
| Post 2 • IP flag post | ||
|
COLLECTOR
|
dielinfinite private msg quote post Address this user | |
| @KatKomics Importing from excel shouldn't be too difficult. You would have to export the data as a text file and maybe do some find/replace to ensure it's in the format that the app is looking for. The problem I foresee is that while your data would be in the app (series titles, issue numbers, publisher), the entries wouldn't be connected to the online database, which is where it draws cover images and additional issue data. To get the most out of the app, those connections can be made manually. While it's not difficult to do, with that many books, it would take a while. |
||
| Post 3 • IP flag post | ||
 COLLECTOR COLLECTOR
|
BigRig private msg quote post Address this user | |
| @KatKomics You can scan books in with barcoders but ones that dont you still have to search for | ||
| Post 4 • IP flag post | ||
|
|
Way2GoDanno private msg quote post Address this user | |
| I found that almost older books don't scan correctly. It usually finds a random issue within the same series. I found the issue to be mostly with books from before the 90s. Even when I use the +2 barcode it still does not work right. It's easier to manually search the books unless they are new books. | ||
| Post 5 • IP flag post | ||
 Collector Collector
|
vacaboca private msg quote post Address this user | |
| @dielinfinite great tips - I've been using CLZ daily for a few years now, on PC and my phone and iPad... I never noticed the additional images capability, or thought of using the Links to point to grader's notes, etc. - thanks! My main tips would be around the use of custom Filters and Sorts - I have a workflow for books flowing through my collection (Wanted, On Order, In Collection with a location of "in processing", then In Collection with a location mapped to a series of short boxes...), and can easily work through my collection and boxes that way. No time to type right now, I'm trying to finish sorting a bunch of stuff right now... but happy to answer questions if anyone has any. |
||
| Post 6 • IP flag post | ||
|
COLLECTOR
|
dielinfinite private msg quote post Address this user | |
| @vacaboca I also forgot to mention, in case it wasn't obvious, that it turns the text in the comic viewer into a hyperlink so you can just click on it to be taken to the website you linked to it. I definitely make use of the status options like "in collection," "wanted," etc but my books aren't very organized so I don't use the location function like you do, though I'm sure other users with loads of long/short boxes would find it useful. Since I ship books off for signatures, commissions, or grading, I use the "Location" feature to note who currently has that book in their possession and I change the status to "On Order" until I get it back. I'm guessing something like that could be integrated into your system if you wanted. |
||
| Post 7 • IP flag post | ||
 Collector Collector
|
MightyMutt private msg quote post Address this user | |
| How about adding grade options? I know I can just add it to the notes section but a few drop downs that include a graded by and the grade number would be helpfull | ||
| Post 8 • IP flag post | ||
|
Collector
|
vacaboca private msg quote post Address this user | |
Quote:Originally Posted by dielinfinite I actually do use the location for that, though it's rare - I currently have a few books that are in "Submitted to CBCS". Quote: Originally Posted by MightyMutt This is another potentially helpful tip - you can control the content and use of just about any drop-down field, including Condition, through the use of Tools>Manage Pick Lists... Early on I completely replaced the contents of the Condition drop-down with my own scheme - specific numbered grades where I have either a slab, or have assigned my own grade, or general letter grades where I've made a quick estimate or assumption. Here's a picture of my current Condition setup... note the use of the Sort Name to control how things show up in the drop-down... that helps it to be logical when I'm using the keyboard to type the entry or with up/down arrows:  Another key thing that I use extensively is Tags - Adding tags to books allows you to easily use the "Tags" folder view to look at your collection in a zillion different ways. I have tags for signatures (e.g., "Signed - Mike Allred" and "Signed - Robert Kirkman" Tags can be a bit hairy when you are bulk editing, as you can't just ADD a Tag to a bunch of books... that will actually overwrite existing tags. Filters are really fantastic for workflow... the main filters I've created and use are "Order Processing" and "Processing". The first one shows books purchased at a particular store/location on a particular date - I use it to double check things I receive in the mail (e.g., my monthly Midtown box, or a large eBay order - which were previously entered and put into the "On Order" status), or to just work through grading/sorting/filing an order (using the Publisher/Series folder view, assigning general or specific grades, changing the location to where it will be filed, or placed for later processing...). I use custom Sort Orders along with the folder views and filters (and the relatively new alphabet bar) to narrow and cut things down to the way I need to work things... my primary sorts are my default Series/Issue Number/Extension and then Purchase Date/Store/Series/Issue Number/Extension. I'm sure there are other strange things I've worked out - I've rarely come up with something that I want or need to do that I couldn't use the program to help with... and having the ability to always have it synced with my devices while traveling and shopping is critical. It takes some discipline to make sure that you have things entered when you order them online - but that means I'm never wondering whether or not I've bought something. |
||
| Post 9 • IP flag post | ||
|
Collector
|
vacaboca private msg quote post Address this user | |
Quote:Originally Posted by MightyMutt I think you might be able to create a custom drop down for Graded By as well as add a custom field for the certificate number... that's a good idea, I'll see if I can do that now. I know you can add custom check boxes at least, so one for each grading company might work... I'm hoping for the drop-down option though. I'll let you know what I figure out, that would be better than my current solution (using a Tag as mentioned above, one for each grading company, and then I add the cert number in the Notes) Edit: Yeah, that was easy... I added a Graded by... drop down and a Cert # field next to it on the User Defined tab, it took a few seconds... that's going to make things a lot easier Here's what it looks like for me at the moment:  |
||
| Post 10 • IP flag post | ||
|
COLLECTOR
|
dielinfinite private msg quote post Address this user | |
| @vacaboca I just woke up so I don't have the mental capacity to absorb all you've written but I'll look it over once I've woken up and throw in my two cents | ||
| Post 11 • IP flag post | ||
 Collector Collector
|
thpike private msg quote post Address this user | |
| I like the app but that's all I use. And since I only have about 152 comics total it's pretty easy |
||
| Post 12 • IP flag post | ||
|
Collector
|
vacaboca private msg quote post Address this user | |
| Hmmm... it looks like User Defined fields (like the ones I just created) don't show up in the apps right now, which means if I completely change over to using those I'll lose the ability to see that info in the apps if I remove the tags... I'm going to keep working with them, with that in mind. |
||
| Post 13 • IP flag post | ||
|
COLLECTOR
|
dielinfinite private msg quote post Address this user | |
| @vacaboca Okay, I've woken up a little and that's pretty much the same setup I have for my graded books but I'll try to do a more in-depth take on it after work. One extra field I do have is one for old certification numbers in the case of books that have been graded multiple times (I also keep the old web links on the Link page) @thpike lol thank you! I don't have loads of experience with the app since I got the desktop program first and I use the free cloud service to check my collection while on the go. I can't add books on the go though, whoch I'm fine with because I find sitting down to do some collection maintenance oddly relaxing |
||
| Post 14 • IP flag post | ||
|
Collector
|
thpike private msg quote post Address this user | |
| @dielinfinite I use the app for when I'm at a store and I'm like..."Do I have this issue...? nope! Sweet!" | ||
| Post 15 • IP flag post | ||
|
|
Way2GoDanno private msg quote post Address this user | |
| Unless it's sitting in the stack you haven't added to your CLZ.... my case all the time. | ||
| Post 16 • IP flag post | ||
|
Collector
|
vacaboca private msg quote post Address this user | |
Quote:Originally Posted by Way2GoDanno Yeah, that's part of the "discipline" issue - I've made logging my purchases a priority... *then* they go in the stack for later sorting/filing/whatever... it definitely takes work, but I've got a routine that makes it go pretty quickly. Recently I went through a busy time where I couldn't log my pickups for a few months, things really built up :/ |
||
| Post 17 • IP flag post | ||
|
COLLECTOR
|
dielinfinite private msg quote post Address this user | |
| @thpike Yup! The paid desktop app allows you to store and view your collection online through their Cloud service. A more fully-featured version of the cloud service is available by subscription but I just use the cloud service to quickly check if I have an issue. | ||
| Post 18 • IP flag post | ||
 I bought a meat grinder on amazon for $60 and it's changed my life. I bought a meat grinder on amazon for $60 and it's changed my life.
|
kaptainmyke private msg quote post Address this user | |
| I'm in the same boat of owning too many books to start a new app. I might buy this app to catalog only graded books and keep my raw collection with exel/comicbookrealm file | ||
| Post 19 • IP flag post | ||
|
Collector
|
vacaboca private msg quote post Address this user | |
Quote:Originally Posted by kaptainmyke Annoyingly enough, I actually also cross-enter my books on comicbookrealm to track overall values. I wish I could link my CLZ database to comicbookrealm to have the value data automatically imported, that would be fantastic. |
||
| Post 20 • IP flag post | ||
|
Collector
|
MightyMutt private msg quote post Address this user | |
| You guys are awesome, thanks for all the tips!! | ||
| Post 21 • IP flag post | ||
|
COLLECTOR
|
dielinfinite private msg quote post Address this user | |
| So I wanted to elaborate a little on what @vacaboca posted earlier this morning. As he said, it's pretty easy to set up your custom fields to add fields for a Grader, the Label, the Grade, and the Certification numbers. There are a few things you can do to customize the experience a little. When you create the Grade's field as a pick list, it will be empty by default. Personally, since I already know all the possible grades my book can get, I like to pre-fill the information so I can just open the drop-down and select the grade. 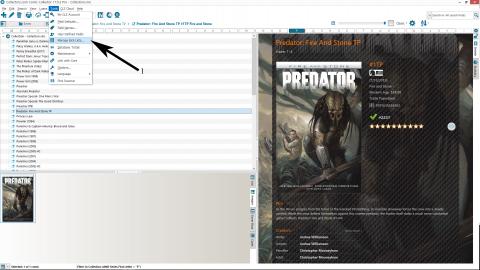 Do do this, we're gonna use the pick list manager. Open it by clicking on the menu as shown here (1) 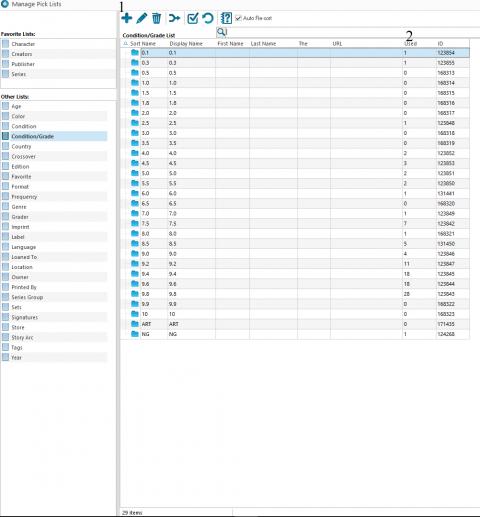 On this new screen, select the field you wish to edit from the column on the left side, in this case it's "Condition/Grade" and you'll see a list of all the options that have been used for this field and how many times they have been used (2). If you haven't used it yet it may be empty. Anyways, to start adding new entries, press the "+" icon (1). The popup should be fairly straight forward, add the name of the option and click Okay. I've gone ahead and added all the grades in the CBCS/CGC grading scale including the NG-No Grade and the CBCS ART label. Now, you could've just as easily filled out this information by selecting the comic, opening the edit comic window and just typed each value in, pressed enter, deleted it and added the next one until you've entered all the values but the Pick List manager contains a lot of the data that drives the app so it's good to get familiar with it. I'll show you guys another examples of its usefulness while sticking close to @vacaboca's original post 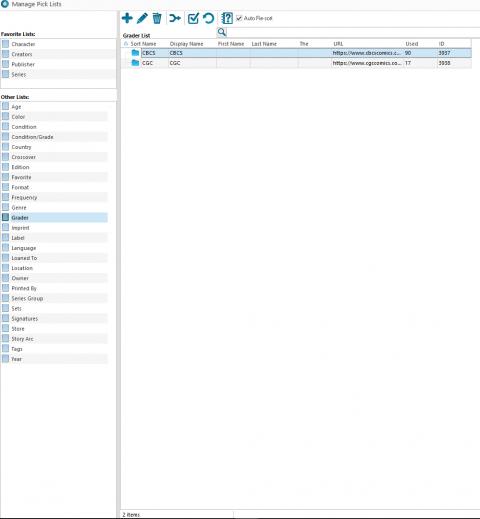 On the left column select "Grader." Again, your list may or may not have anything here. I've already added the two graders I have books from, CBCS and CGC. If you double click either one you'll get the following screen, very similar to the one you used earlier: 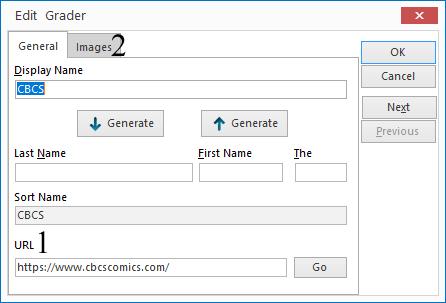 For graders, in addition to the name, I like to add a URL to that company's website. A lot of fields have this option available so think of the different ways you can link the app to additional information on the web. For example, I link the label types to the label descriptions the grading companies have on their websites. If you click on the Images tab (2) you'll be taken to the following window: 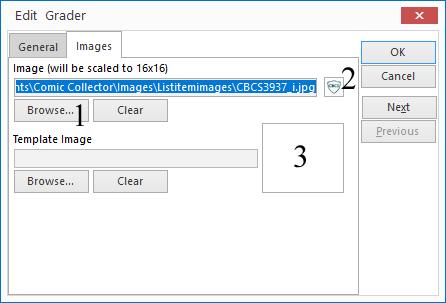 Now, adding images here is hardly vital but it does spruce up the app a little bit here and there as I'll show you in a little bit. For now, this screen is pretty straight forward. Use the Browse button (1) to search for an image (I suggest saving new images into the Listitemimages folder the app uses by default. As you can see the first image will be scaled to a mere 16x16 (it actually creates a copy of the image in that folder and scales that) but that's the one you'll see most often, I think. You'll see a preview of it at (2). Template image is allowed to be a bit larger and isn't used as much as far as I'm aware. And that's pretty much how the Pick List Manager works. Poke around at the different fields available to edit and update. There are options for consolidating data, for example, if on a some of books you used "Ace Edition" and some you used "Wizard ACE Edition" and you'd like to consolidate all of them under a common name without hunting down and editing each book individually. You can go to the Editions data, find the two values you'd like to consolidate, ctlr+Click to select them and then press the merge data button (the two lines merging into a single arrow) to merge the data together and now you can pick one name that will be applied to all the books that previously used either of those names before. Click Okay, and close the Pick List Manager and you're done. 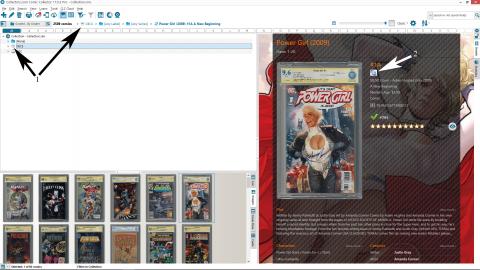 The small images you added will be used whenever you're filtering by that field as you can see in (1) and the larger, template image is what the app uses for the Publisher logos you can see at (2). 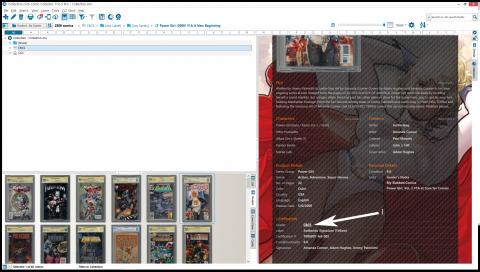 If you scroll down a little bit, you can access any URLs you've added directly from the comic viewer as shown (1) |
||
| Post 22 • IP flag post | ||
|
Collector
|
MightyMutt private msg quote post Address this user | |
| Ok so now I'm going to ask a question I should have started with. Are you guys using the pc, Web or app version to do all the work? | ||
| Post 23 • IP flag post | ||
|
Collector
|
vacaboca private msg quote post Address this user | |
Quote:Originally Posted by MightyMutt I think you can only do this kind of customization stuff on the PC version... that's certainly where our screenshots are coming from. |
||
| Post 24 • IP flag post | ||
|
COLLECTOR
|
dielinfinite private msg quote post Address this user | |
Quote:Originally Posted by MightyMuttI'm using the Pro license which allows you to add the custom fields, custom sort folders, and a few more minor features. |
||
| Post 25 • IP flag post | ||
 Collector Collector
|
suckerv private msg quote post Address this user | |
| . | ||
| Post 26 • IP flag post | ||
 COLLECTOR COLLECTOR
|
DarthLego private msg quote post Address this user | |
| * | ||
| Post 27 • IP flag post | ||
|
COLLECTOR
|
dielinfinite private msg quote post Address this user | |
| Okay, so today I'm gonna go over something pretty basic but also integral to the CLZ ecosystem and that's adding issues/variants that don't currently exist in the database. So I'll start off with adding a book from scratch to a series that doesn't exist in the database. 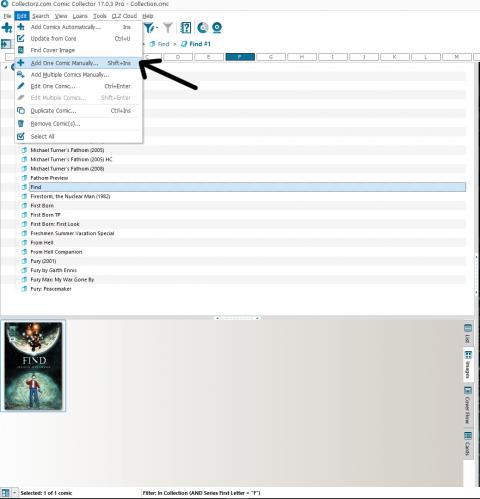 To start, go to EDIT > Add One Comic Manually 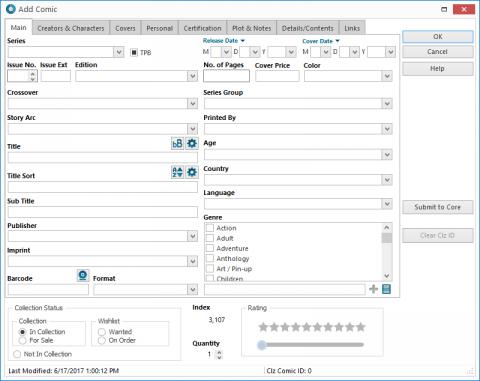 You will be brought to this screen. It probably looks familiar since I've spoken a little about it before except now it is all blank since this is a new book. Start off by adding all the information to as many fields and as many tabs as you can. I try to at least fill out the "Main" tab and the front cover image. Since this is a book that I'd like to go into the database for others to use, I try to stick with the data format CLZ uses on their other titles for the initial submission even if I plan to change it later to my own naming format. Once you're done adding information, click the "Submit to Core" button (Core being the name of CLZ's database) on the bottom right 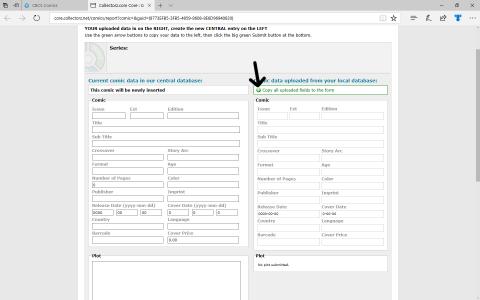 Your web browser will open and you will be asked to sign with your CLZ account and then you will be taken to screen similar to this one. The screen will have two columns. The column on the left lists the information as it currently exists in the database. Since this is a new issue, there is no information in the database the left column is empty. The column on the right should include all the information you added in the step above. For a new issue, you'll probably want to press the "Copy all uploaded fields" button so you can submit all your data into the database.  Once the information looks good, scroll down and press the "Submit Comic" Button. Back in CLZ, don't forget to confirm your local changes by clicking OK on the "Add Comic Window" Submitting a change to an existing issue is very much like the above process, except that you select a comic in your collection, and press the Edit Comic button. 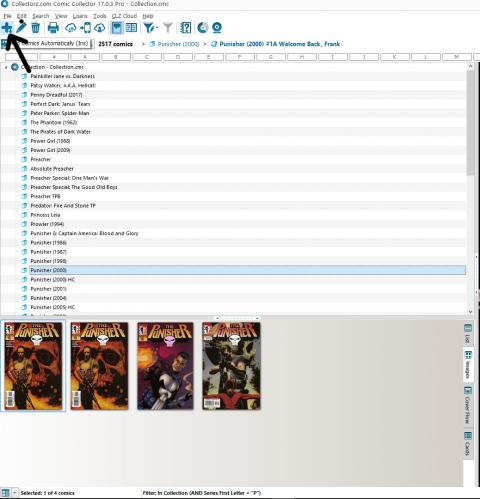 Sometimes when you go to add a variant of an issue... 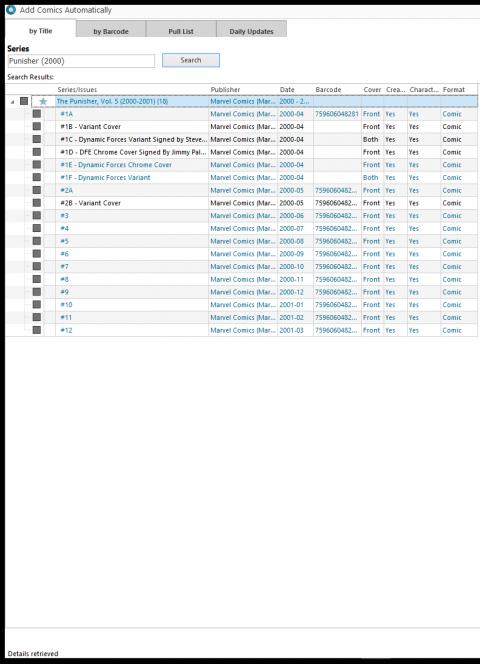 You'll find that the variant isn't in the database. Now I basically just included this image to remind you to take note of the issue number and the latest variant letter that is currently in the database since you'll need that for later. 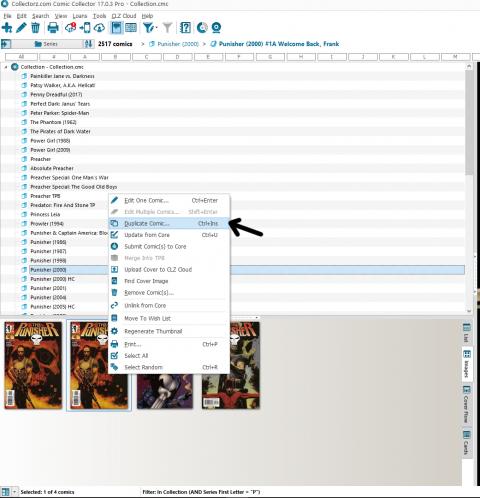 Since the variant isn't necessarily a new comic, you might want to consider starting from an existing issue so you don't have to add all the information by hand. Just right click and press Duplicate Comic 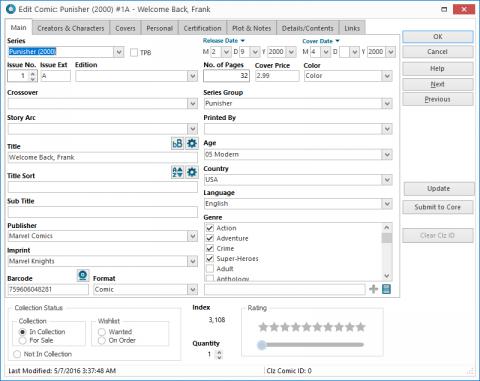 Click the Edit Comic button and you'll be brought back to this screen. Make the changes necessary to be correct for the new variant. The important fields for this tend to be Issue Ext (this is where the variant letters I mentioned before come in to play. Add the next letter in the sequence from what is already in the database. The sequence is pretty straightforward, A...Z,AA...AZ,BA...etc), Edition, Barcode, and of course the cover art. Once you're done, click "Submit to Core" and you will be directed again to the CLZ website to add the issue. Now, one thing to be aware of is that every book in CLZ's database has a Clz Comic ID. This is how the app knows what issue in your personal collection corresponds to an issue in their database, regardless of what changes you make to your local data (for example, I change the series names in my collection to use the year the series started instead of using volume numbers like Clz does but it still knows that Punisher (2000) in my collection refers to Punisher volume 5 in their database). 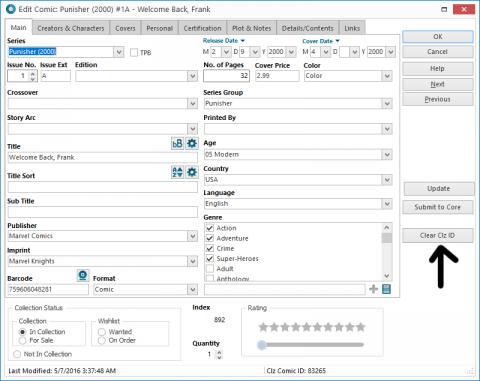 When you use the Duplicate Comic command I showed you above, the duplicate is created without a Clz Comic ID, which is why the app tries to add a new comic instead of editing an existing one. If for some reason you need to submit an existing issue as a new issue, you will have to manually clear the Clz Comic ID from the book which you do by pressing the above button. The Update button above the Submit to Core allows you to download updates for that specific book from Core so that you have more up to date data. You can select what data you would like the Update Button to download on a global basis but I will go over that at a later date. 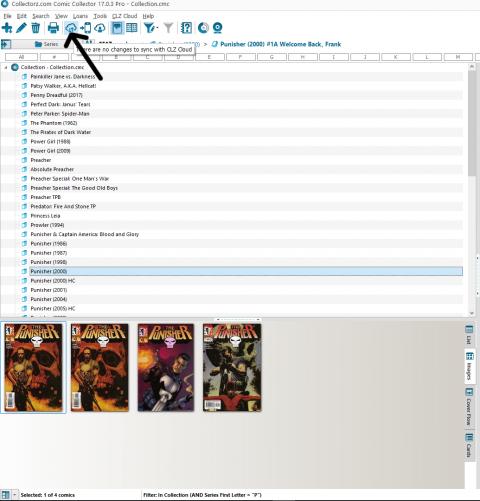 From now on, when you click the Sync with Cloud button, if you have books in your collection that do not have a CLZ Comic ID, you will get the following pop-up... 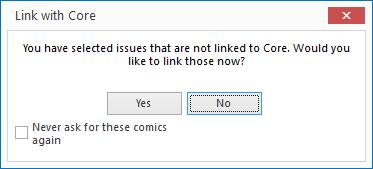 Basically the app wants to know if you want to assign CLZ Comic IDs to the books in your collection that don't have them. This is what you use after the new issue you added has been accepted into the database and now you can link the issue in your collection to the corresponding issue in the database by clicking Yes. You can also choose to do it later and click No. Also, take notice of the "Never ask for these comics again" button. This basically means that any comics with missing CLZ Comic IDs will no longer trigger this message. I personally use this feature with my custom-bound hardcovers. They're not officially published books so I don't add those to the CLZ Database but I also don't want to be bugged with this pop-up forever since I've chosen not to assign them an ID. 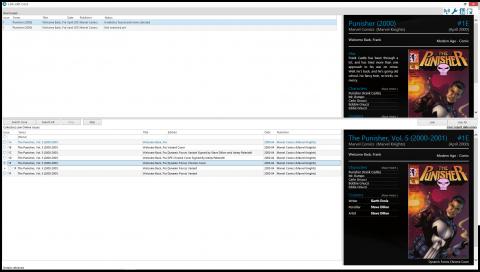 Clicking yes will bring you to this screen. The list in the top half are the books in your collection without ID numbers. The app will use the issue data and number in your local info to try to find the issue in the database. The search results appear on the bottom half of the screen. Double click on the issue in the bottom screen to load the image and info in the right side of the screen. If the issue you're looking for doesn't appear then it's likely that your changes haven't yet been accepted to the database so there's nothing to find. In that case, you can press Skip, or just close the window. If you find the search results are wrong in that it's searching for "Peter-Parker: Spider-Man" instead of "Amazing Spider-Man", you can modify the search parameters yourself by pressing F2 or right clicking the issue in the top half of the screen and selecting "Edit Search Criteria." Here you'll be able to specify the series and issue number to search for. Anyways, once you've found the correct issue, press the radio button to the left of the issue number and click "Link" on the right side of the screen to assign that book's ID number to your local book. Once you've linked all your books or closed the Link with Core window... 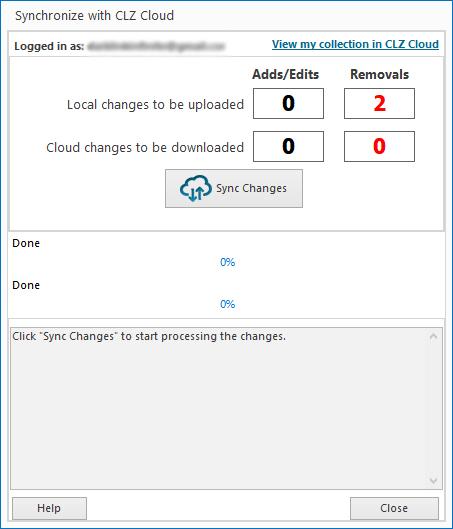 If there are changes to upload click synch with core, and you're done and your data safe to come back to later! |
||
| Post 28 • IP flag post | ||
Pages:
1This topic is archived. Start new topic?